My first robot (Dapper Robot) happened by happy accident one very late night when I was struggling to finish some pieces for display at a local Starbucks. From that one fevered night came the beginning of a theme, something I had never had before as an artist.
I like my robots. They’re not as elegant or high-brow-artsy as the work I dream of producing someday, but they make me happy and I keep getting ideas for new ones to try so (for now at least) they are here to stay. And since, as an artist, I love to hear about other artists’ processes in creating work, here’s how my robots are made.
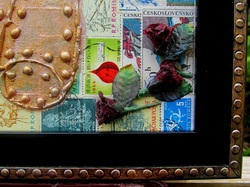
I begin with a stretched canvas or canvas board and cover it with some kind of ground. I’ve used scrapbooking paper, fabric, paper scraps, paint, and, on a couple smaller pieces, postage stamps.
I like my robots. They’re not as elegant or high-brow-artsy as the work I dream of producing someday, but they make me happy and I keep getting ideas for new ones to try so (for now at least) they are here to stay. And since, as an artist, I love to hear about other artists’ processes in creating work, here’s how my robots are made.
I begin with a stretched canvas or canvas board and cover it with some kind of ground. I’ve used scrapbooking paper, fabric, paper scraps, paint, and, on a couple smaller pieces, postage stamps.
Then, I loosely sketch out the robot and whatever additional scenery or objects I want to include in the picture. Occasionally I just skip the sketch and freehand them in the next steps.
Second (except in the case where the ground was stamps) I Mod Podge postage stamps into the shape of the robot, etc. until all the figures are roughly filled.
Second (except in the case where the ground was stamps) I Mod Podge postage stamps into the shape of the robot, etc. until all the figures are roughly filled.
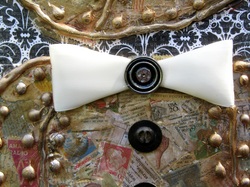
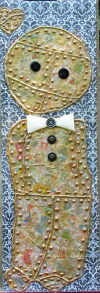
To flesh out the rough shape, I outline the figures with hot glue, adding in rivets, contours and other details to make them look like more than vaguely shapeless blobs.
Next comes a light layer of metallic acrylic paint. With a dry brush technique and repetitive strokes over the stamps, one can obtain the tone and sheen of the metallic paint but still be able to discern the color and images of the stamps underneath.
The final step in creating my robots is to add button eyes and other accessories. Each robot has unique additions to give it its own character. They’re usually some reference to an outfit (buttons down the front, ties and scarves, etc.) and are sometimes accessories or environmental (paper leaves and flowers, claws, etc.). In a rare instance the robot I’m currently working on (a Dorothy and Toto robot pair) wears a full dress plus ribbons in her hair.
With that, voila! You have a completed robot ala Mary!
 RSS Feed